|
1. Embroider all lace designs that you will need for assembling the
project, using 2-3 layers of water-soluble
fabric, on lowest speed your machine allows.
The number of Water
Soluble Stabilizer layers depends on type of backing you use, and on design
density; for Shamrock
lace we've used 2 layers of fabric WSB.
Attention: It may seem to you that one layer of strong WSB is enough.
Yet, many machines start breaking thread terribly, when only one layer on WSB
is used. We've noticed that often an extra layer of water-soluble just solves
this problem. So avoid trying to save an extra layer, even if your WSB is very
strong. And if you still see many thread breaks with 2 layers - try to add a
third one.
It's best to embroider each section in separate hoop. For each design, try to
pick up the smallest suitable hoop you can.
Make sure that hooped WSB can't move, even slightly. If your hoop is far from
perfect, and holds fabric badly - consider purchasing a new hoop with special
metal spins. This is quite a small expense that can take your embroidery to a
totally new level. Most machine dealers now carry those wonderful new hoops
with spins. As a temporary solution, you can wrap a paper towel around one hoop
frame, to add friction and prevent your backing from moving.
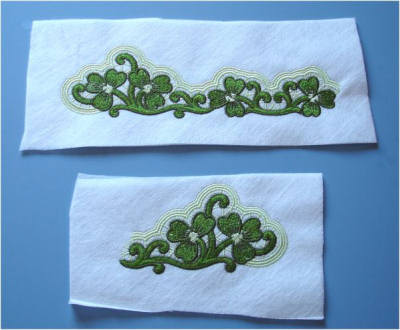
After you've stitched the lace pieces, cut away large edges of water soluble
backing around each design, leaving about 1 inch from each side, like this:

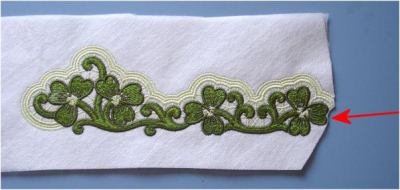
2. Cut away the backing on the very edge of "top border part"
(the edge of design that should be placed over the second one; look at the
photo, to understand what we mean):

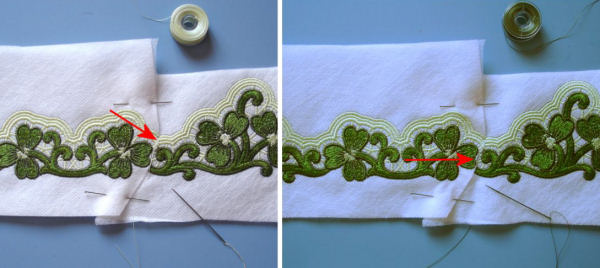
3. WHILE THE WSB STILL THERE, position the lace parts one over another,
like they should be on finished project, and secure them together with sewing
pins:

4. Hand-stitch the pieces together, with same thread color used on the
design. This border parts have been stitched together in 2 spots. We've used 60 wt bobbin
thread because it is thinner and therefore less noticeable on design top.

It's also possible to use invisible thread for attaching the parts, but regular
bobbin thread in same color is better. Invisible threads have a kind of
"fishing thread" sheen that isn't very beautiful.
It's not recommended to stitch such small areas using a sewing machine. It's
easier to do this manually, and the results are really better this way.
5. When the lace is "assembled", it's time to attach it to
fabric base (of the towel, in our case).
WHILE THE WSB STILL THERE, position the lace border over the fabric base, and
attach it to fabric with sewing pins:

6. Sew the lace border onto the fabric base, using regular running
stitch. Use same thread color like on the design top. Use invisible thread ONLY
if you have absolutely no choice.
We've also noticed that 60-wt bobbin
thread works much better for this purpose than regular 40-wt embroidery
thread. That's another reason to use prewound color bobbins in same color like
your top thread. You can then use the bobbin thread on top, when sewing your
laces to fabric base.

7. Cut away the excess fabrics edges, and finish the edges on your
sewing machine, using small and relatively dense zigzag stitch, in following
manner:

8. Ready!

P.S.
If you'd like to get Shamrock Lace, stabilizer or thread used in this project -
please visit these links:
Dantela Lace Designs
Machine Top & Bobbin Embroidery Thread
Water soluble fabric
<- Back to the main menu
|
